
Choose Garage Overhead Storage That Actually Fits
Compare ceiling racks, hoists and wall storage, then measure door travel, framing, tote clearance and verified load limits before installation.
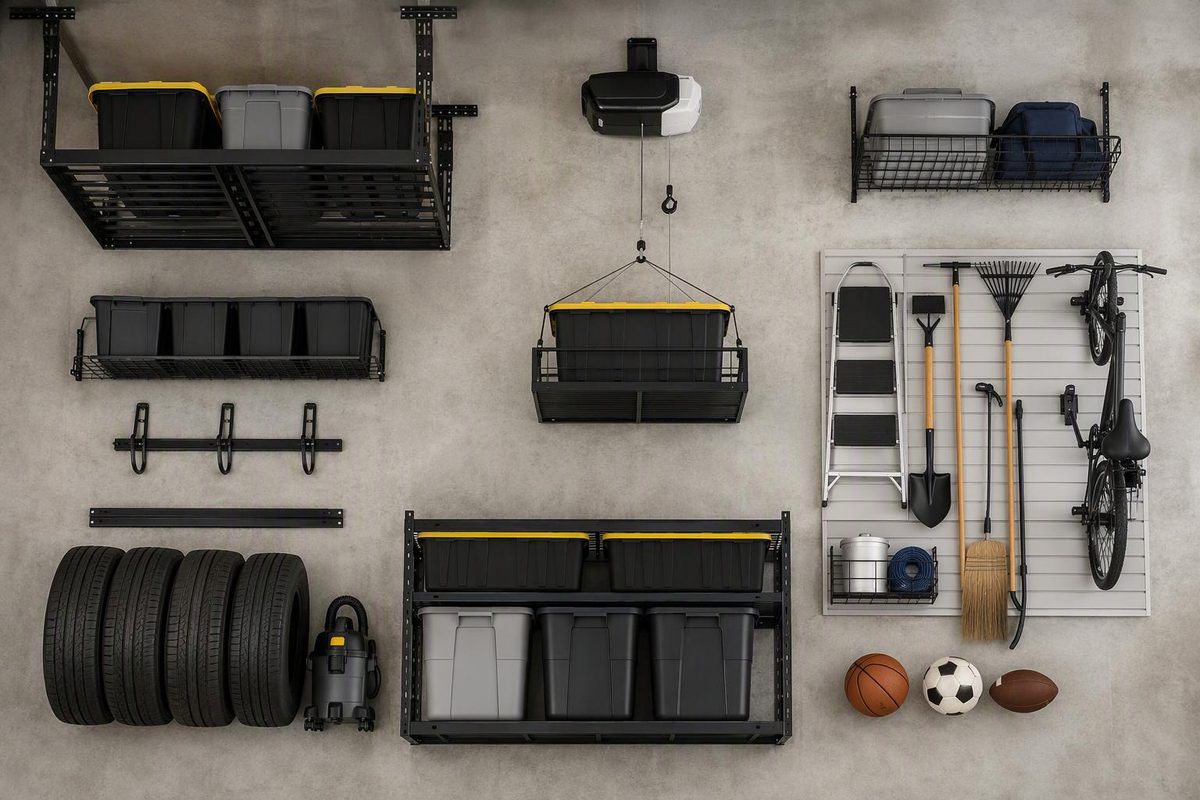
A fixed overhead storage system for a garage works best for sealed totes and other infrequently used items when the ceiling framing is suitable and the entire rack remains outside the garage door’s moving envelope. Choose a hoist, powered lift, high wall shelf or floor-supported rack instead when access, framing or clearance rules out a fixed ceiling rack.
Enter your ceiling, obstruction and tote measurements to check the raw vertical space.
Overhead Clearance Check
Measure all three values from the finished floor, using inches.
Blank measurements remain unknown; they are not treated as zero.
Method: raw envelope = ceiling height minus the highest occupied point. This is a dimensional screen only; rack instructions and verified framing determine installation and load limits.
The calculator shows only a preliminary dimensional check. A positive result must still accommodate the rack deck, brackets, installation tolerances and enough handling room to tilt a tote into place. There is no universal extra-inch allowance because racks, doors, vehicles and framing differ.
Do not choose from rack dimensions and advertised capacity alone. Measure the door, opener, ceiling structure, obstructions and stored items first.
Match the System to What You Store
| System | Best Use | Main Limitation |
|---|---|---|
| Fixed suspended rack | Totes, camping gear and seasonal decorations | Requires ladder access and verified structural mounting |
| High wall shelf | Frequently accessed bins or ceilings unsuitable for a rack | Uses wall area and may conflict with doors, vehicles or cabinets |
| Ceiling hoist | Kayak, cargo box, ladder or another bulky item | Ropes, straps and load balance require attention |
| Powered platform lift | Regular access without carrying bins down a ladder | Higher cost, moving parts and electrical or clearance requirements |
| Tote-rail rack | Repeated identical totes without a shelf deck | Tote lips and dimensions must match the rail layout |
Do not use an overhead rack for loose, unstable or leaking items, or for anything prohibited by the rack manufacturer. Keep dense items low whenever practical. If ceiling attachment is questionable, use a floor-supported rack or a wall-and-floor system such as these 27-gallon tote storage rack plans.
Measure the Garage in This Order
1. Map the Door’s Complete Travel Zone
Measure with the door closed, fully open and at the highest point reached while moving. Include:
- Door sections or the one-piece door
- Horizontal and curved tracks
- Rollers, hinges and top fixtures
- Torsion shaft or extension-spring hardware
- Opener rail, trolley, motor and hanging brackets
- Door arm and emergency-release rope
A sectional door can project higher during travel than when parked open. Chamberlain’s installation manual uses the door’s highest point of travel to establish opener clearance rather than relying only on its final open position (Chamberlain installation manual). Apply the same principle to storage placement.
Cycle a normally operating door while observing from a safe position. Mark the occupied zone on a sketch or transfer it to the ceiling with painter’s tape. Keep the rack, bins and dangling hooks outside that zone.
Stop if the door binds, sticks, hangs crooked, has a loose cable or needs spring adjustment before the rack will fit. Address the door separately. Do not loosen or relocate springs, cables, pulleys, brackets or tracks to create storage space. The Chamberlain manual identifies those components as being under extreme tension and directs owners to use a trained door-systems technician for a binding or unbalanced door.
2. Reserve Space for Vehicles and Access
Check more than roof height. Open the SUV hatch, pickup tailgate and vehicle doors in their normal parking positions. Account for roof racks, antennas and a possible taller replacement vehicle. Confirm that a suitable ladder can stand level and that a tote can be handled without passing over a vehicle.
Choose a deliberate clearance margin rather than designing the rack to nearly touch a vehicle or moving door. No single extra-inch allowance applies to every installation: rack deflection, door hardware, vehicles and framing vary.
3. Map Fixed Ceiling Obstructions
Record lights, electrical boxes, opener outlets, attic access, ducts, plumbing, gas vents and sprinkler heads. Do not block an attic hatch or make the opener’s plug and controls inaccessible.
If the garage is sprinklered, do not apply a generic clearance found online. NFPA explains that obstruction requirements depend on factors including the sprinkler type and the obstruction’s size and position (NFPA sprinkler-obstruction guidance). Have the proposed layout checked by the sprinkler contractor or local fire authority before drilling.
4. Identify the Framing, Not Just the Drywall
Drywall is a finish, not the rack support. Determine:
- Framing direction and spacing
- Whether the members are solid-sawn joists, trusses, I-joists, steel or concrete
- Member depth and visible condition
- Locations of wiring, pipes and ducts above the finish
Product compatibility varies. SafeRacks’ 4-by-8-foot model requires installation into wood joists and excludes I-beams, steel joists, concrete ceilings and other nontraditional materials (SafeRacks specifications). A different product may provide an approved detail for another substrate, but its hardware and instructions must explicitly cover that construction.
A stud finder is a locating aid, not proof of framing type or condition. If there is access above, verify the marks visually. Otherwise, construction drawings, a qualified installer or a structural professional may be needed.
Stop if the ceiling is sagging, water-damaged, cracked, altered or structurally uncertain. Do not cut, notch, drill or otherwise alter a truss member to make a rack fit. Section R802.10.4 of the 2018 International Residential Code requires registered-design-professional approval for truss alterations and verification when an added load exceeds the truss design load (ICC Section R802.10.4). The locally adopted code and amendments govern the project.
Convert the Measurements Into a Rack Size
Use the actual outside dimensions of the rack and totes, not their nominal names.
- Set the rack-bottom elevation. It must remain above the highest door component, opener hardware and raised vehicle hatch beneath the proposed location.
- Calculate storage height. Subtract the planned deck elevation from the ceiling height, then allow enough handling space to tilt a tote onto the rack without striking the ceiling.
- Check tote orientation. Confirm that each tote fits lid-up in the planned direction and that multiple rows fit without overhang.
- Plot every ceiling bracket. A rack fits only if every bracket can land where its manual permits on suitable framing.
- Test access. Make sure a ladder can stand level and the tote can move from ladder to shelf without passing over a vehicle.
An adjustable “12–45 inch drop” does not automatically provide 45 inches of useful storage. A lower deck may collide with the open door or vehicle, while a shallow drop may leave too little room to place a tote.
Depth and width also need separate checks. Compare the rack’s outside dimensions with the clear ceiling area, then compare its usable deck dimensions with the totes. Include lid rims, handles and any taper that changes the tote’s maximum exterior dimensions.
Treat Capacity as Two Separate Limits
The rack rating does not establish what the building framing can support. The permitted load must be no greater than both the exact rack model’s rating and the verified allowance for the building framing at that mounting location.
The cited SafeRacks 4-by-8 rack is listed for 600 pounds total when properly installed and evenly loaded. Its assembly instructions tie the stated limits to particular wood-framing and lag-screw assumptions, identify the ceiling framing as the system’s weakest point, and direct users to place heavy objects near the vertical posts (SafeRacks assembly instructions).
By comparison, an Everest Max manual lists 750 pounds evenly distributed, requires wood-joist installation and says fasteners must be centered in the joists to meet the tested limits (Everest Max installation guide).
Those ratings cannot be transferred to another rack. The allowable load must satisfy both:
- The exact rack model’s rating, mounting pattern and fastener requirements
- The capacity and condition of the building framing at that location
Weigh loaded bins rather than estimating. Label each tote and maintain a running total for each rack. Distribute the load exactly as the manual directs, and never climb or hang from the rack.
Stop Installation When the Structure or Clearance Is Uncertain
Pause and use a qualified installer or structural professional when:
- The framing type or member centerline cannot be confirmed
- The manual does not approve the ceiling construction
- A truss or engineered member would need alteration
- Wiring, plumbing or other concealed services may be in the drilling path
- The intended load is substantial, concentrated or not verified for the framing
- The rack could obstruct sprinkler performance
- The rack cannot remain clear of the door through its full cycle
- The work cannot be completed from a stable ladder with the helpers required by the manual
After installation, cycle the normally operating door with the rack empty. Confirm clearance at the highest point of travel and throughout the cycle. Load the rack within the verified limit, then recheck its elevation, connections and clearance before operating the door again.
Inspect fasteners, connections, decking and load distribution at the manufacturer’s specified interval and after any impact or visible movement.