
Find the Right Seal for the Gap Under Your Garage Door
Match the existing retainer and seal profile first, then compare compatible materials by climate, floor condition, availability, and budget.
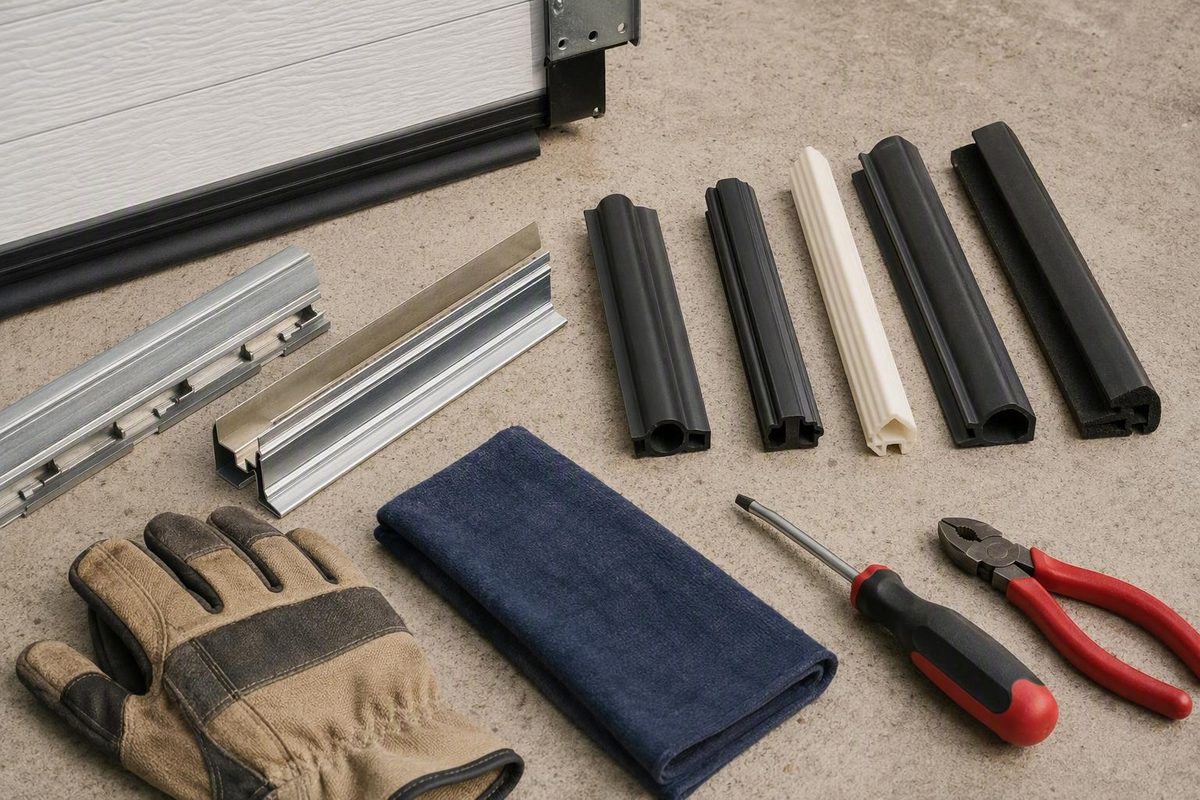
Choose a bottom weather seal for your garage door by matching the existing retainer and seal profile first—not by relying on door width or a “universal” label alone. Then compare compatible materials for your climate, floor condition, availability, and budget.
Start Here: Match the Seal to the Existing Retainer
A garage-door bottom seal attaches to the lower edge of the door and compresses against the floor when the door closes. It must fit the metal or plastic retainer, sometimes called the track, along the bottom of the door.
Before shopping, examine an exposed end of the current seal. If necessary, pull out only enough worn material to see its cross-section. Note whether the retainer has one channel, two channels, or another attachment arrangement. Take a clear end-view photo for comparison with the replacement manufacturer’s labeled diagrams.
Match both the physical profile and the door width against the product specifications.
Inspect the retainer as well as the flexible seal.
Pre-purchase checklist
- Existing seal’s end profile
- Number and arrangement of retainer channels
- Retainer condition
- Full door width
- Smooth, rough, sloped, or uneven floor
- Typical hot- and cold-weather exposure
- Visible gap pattern: uniform, one-sided, or intermittent
The gap pattern is a reason to inspect the entire opening, not a diagnosis by itself. Check the seal, retainer, floor contact, and door position before assuming that a thicker replacement will solve a concentrated or irregular gap.
Identify the Common Bottom-Seal Profiles
Bottom seals are commonly marketed as T-style, U-style or bulb-style, and bead-style. These names can help narrow the search, but the end profile and retainer arrangement provide the more reliable compatibility check.
- T-style: One or two T-shaped ends slide lengthwise into corresponding channels in the retainer. Products are available for single- and double-channel arrangements.
- U-style or bulb-style: The installed seal forms a tube or rounded bulb that compresses against the floor. Sellers may use “U-style” and “bulb-style” for overlapping product categories, so neither term guarantees a particular fit.
For a schematic end-view comparison, picture a T-style seal as having one or two narrow T-shaped attachment ends, a U-style or bulb-style seal as forming a compressible tube, and a bead-style seal as having rounded attachment edges. These descriptions identify general shapes only; they do not establish the attachment dimensions required by your retainer.
Compare your end-view photo directly with the replacement maker’s labeled illustration and specifications. Avoid selecting by appearance from a front or side view because the attachment points may be hidden.
If the profile is unfamiliar, the retainer is damaged, or the door uses custom bottom hardware, contact the door manufacturer or a garage-door professional before ordering.
Choose Rubber, Vinyl, or Silicone
Compatibility comes first. Once you have identified products designed for your retainer, compare their flexibility, cold-weather behavior, exposure characteristics, rough-floor suitability, availability, and relative cost.
| Material | Flexibility and cold weather | Exposure and rough-floor suitability | Availability and cost |
|---|---|---|---|
| Rubber | Characterized as flexible, but it may stiffen or crack over time, especially in very cold conditions | Described as useful on uneven floors because it can conform to minor irregularities | Availability and price vary by compatible product |
| Vinyl | Generally less flexible in cold weather | Characterized as resistant to moisture and ultraviolet exposure, but potentially less effective on rough concrete | Availability and price vary by compatible product |
| Silicone | Characterized as flexible across wider temperature extremes and resistant to cracking | Described as resistant to fading and general weather exposure | Generally more expensive and harder to find |
These are qualitative descriptions from a garage-door manufacturer’s buying guide, not independent head-to-head test results. Performance can also vary by formulation and product design.
For a mildly irregular floor, prioritize a compatible product flexible enough to follow the surface. In a severe winter climate, pay particular attention to cold-weather flexibility. If multiple compatible products meet those needs, availability and budget can guide the final choice.
Decide Between a Bottom Seal and a Floor Threshold
A door-mounted bottom seal and a floor-mounted threshold serve related but different purposes. The bottom seal moves with the door, while the threshold remains attached to the garage floor.
| Configuration | Best starting point | Main advantage | Important limitation |
|---|---|---|---|
| Bottom seal only | The existing door seal is cracked, brittle, torn, or missing | Restores the door’s normal compressible contact with the floor | Cannot correct major alignment, hardware, slab, or drainage defects |
| Threshold only | A suitable door seal remains in place, but the floor needs a raised contact point | Can supplement the opening where the floor is mildly uneven or the garage sits below the driveway | Does not repair a deteriorated door-mounted seal |
| Bottom seal plus threshold | Minor irregularities remain after a compatible bottom seal is installed | Provides complementary contact surfaces on the door and floor | Requires careful placement so the door closes without excessive resistance |
Start with a compatible replacement bottom seal when the existing door-mounted seal is visibly deteriorated or missing. Consider a threshold when a suitable bottom seal needs a more defined contact point because the floor is mildly uneven or the garage sits below the driveway.
If water persistently collects at or enters through the opening, assess the driveway slope, slab slope, and drainage rather than assuming the seal is the only cause.
Threshold installation depends on the product, floor coating, concrete condition, and adhesive. Follow the threshold manufacturer’s surface-preparation and placement instructions along with the adhesive manufacturer’s application and cure requirements.
Replace the Door-Mounted Seal
Routine replacement may be manageable when the door is stable, the attachment method is understood, and the retainer is intact.
Before beginning, set clear limits on the work. Open the door only as needed for access and keep clear of hinges, rollers, tracks, cables, and other moving components. Do not loosen or adjust springs, cables, tracks, brackets, or other load-bearing hardware, and do not increase opener force to overcome resistance from a thicker or poorly fitted seal. Stop and seek professional help if the door is heavy or unstable, the retainer is damaged, the hardware is custom or unfamiliar, or the problem involves tracks or alignment, as advised in Clopay’s garage-door seal guide.
- Confirm the replacement profile. Compare the new seal with the old seal and retainer before removing the full existing length.
- Position the door for safe access. Use only the access needed for the attachment method.
- Remove the worn seal. Slide or pull it from the retainer according to its design.
- Clean the door bottom and retainer. Remove dirt and residue that could obstruct the channels.
- Measure and cut the replacement. Follow the product instructions for sizing and trimming.
- Insert or fasten the seal. Feed it evenly into the correct channels or attachment points without stretching it unevenly.
- Close and inspect the door. Check for consistent floor contact rather than forcing the seal into heavy compression.
With the door closed, look for remaining daylight, isolated gaps, bunching, pullout, sticking, or difficulty closing. A persistent problem may indicate an incompatible profile, damaged retainer, substantially uneven floor, or door-alignment issue rather than an undersized seal.
If the door does not close normally, reopen it and correct the seal fit or have the door evaluated. Do not use additional opener force to push an unsuitable seal into place.
Inspect and Maintain the New Seal
Inspect the seal periodically for cracks, brittle or hardened sections, pulled-out edges, and areas that no longer contact the floor. Drafts, recurring debris, minor water entry, or evidence of pests are also reasons to inspect the full opening.
Clean accumulated grit with a damp cloth or mild soap. Avoid harsh solvents and petroleum-based lubricants, which may be incompatible with the seal material. If lubrication is permitted, use only a seal-compatible product identified by the door or seal manufacturer.
As maintenance guidance rather than a fixed requirement, Clopay recommends inspecting seals every three months and gives two to three years as a replacement rule of thumb. For a newly installed adhesive threshold, the guide advises keeping vehicles off it for at least 24 hours, although the adhesive manufacturer’s stated cure time controls in every case. Actual service life and inspection needs depend on condition, climate, exposure, material, and use. See the manufacturer’s maintenance guidance.
Select in this order: match the existing retainer and profile, choose a compatible material for the climate and floor, install it without disturbing load-bearing hardware, and verify even contact without excessive resistance. If gaps persist because of alignment, damaged hardware, drainage, or major slab problems, obtain the appropriate professional assessment rather than continuing to treat the issue as a seal-only repair.