
Is That Amber Photo Eye Normal? Diagnose Both Sensors Before Adjusting Anything
A steady amber sender may be normal if the opposite light is also steady. If it is off or flickering, check the beam, lenses, alignment, brackets and wiring.
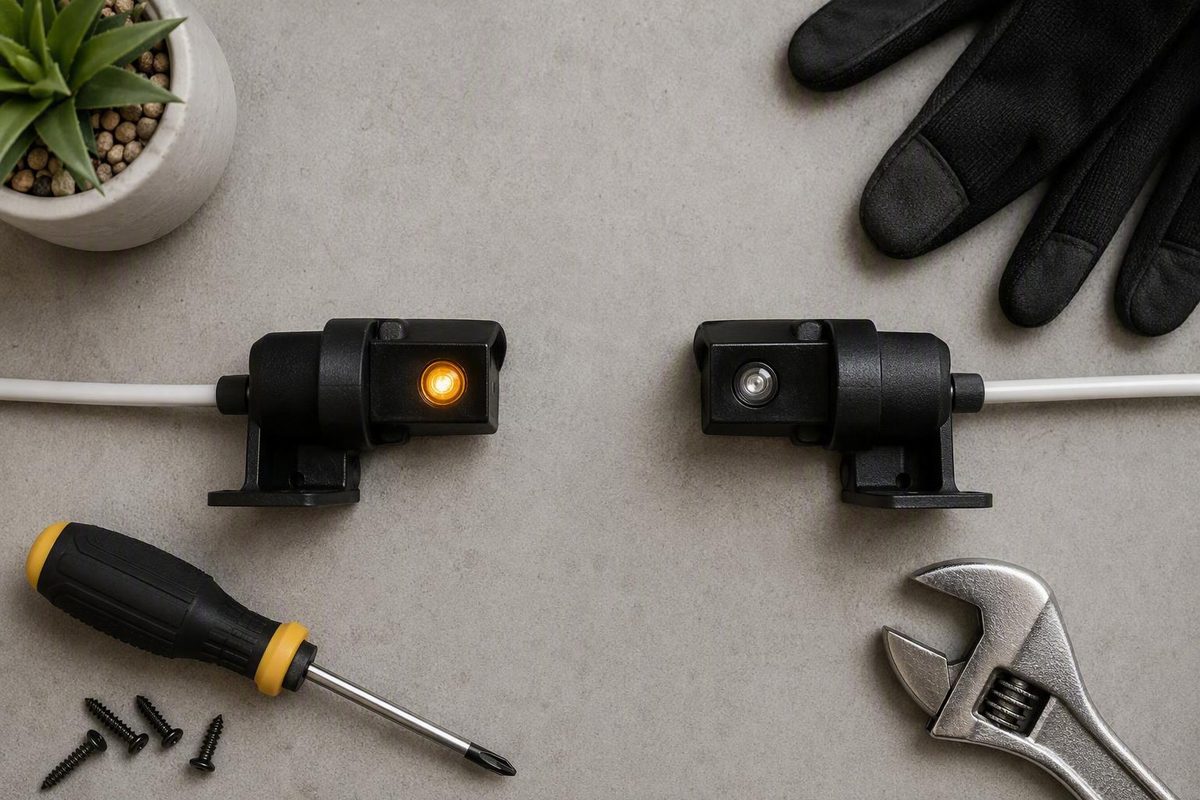
Quick answer: A steady yellow light is often normal—but not universal
A steady yellow garage door sensor light does not automatically mean something is wrong. On the Chamberlain and LiftMaster systems covered by the manufacturer’s guidance, the yellow-orange or amber LED identifies the sending safety sensor. A common normal pairing is:
- Sending sensor: steady amber or yellow-orange
- Receiving sensor: steady green
- Door behavior: closes normally
The amber light indicates that the sending side is active. It does not prove that the opposite sensor receives the infrared beam. Both LEDs should glow steadily when the covered sensors are unobstructed, aligned, powered, and connected correctly; an off or flickering receiving LED may indicate an obstruction, misalignment, wiring problem, or sensor fault. See Chamberlain Group’s safety-sensor troubleshooting guidance.
Pay attention to the indicator’s behavior, not just its color:
- Steady: may be normal for that sensor and model.
- Blinking or flickering: indicates an unstable or model-specific condition worth investigating.
- Dim: may reflect interference, an unstable connection, or another model-specific condition.
- Off: may involve power, wiring, a connection, or a component fault.
Do not assign a precise meaning to a blink rate, dim light, or color change unless the diagnostic chart for your exact opener does so.
LED colors are not standardized across every brand, model, or sensor generation. Even within the Chamberlain family, the amber-and-green arrangement is not universal: sensor model 41A4373A uses green LEDs on both units, while other listed models use amber on the sender and green on the receiver. Sensor appearance also varies by model. Compare the models in Chamberlain Group’s sensor-identification guide.
Before interpreting any yellow, amber, green, red, or orange indicator as a fault:
- Find the opener’s brand and model number.
- Identify the sensor model if possible.
- Check both sensor LEDs.
- Note whether the door fails while opening, closing, or both.
- Consult the manual or diagnostic chart for that exact equipment.
Color is a clue. The complete diagnosis comes from the model, both lights, and the door’s behavior.
How the sending and receiving safety sensors work together
Garage-door photo eyes operate as a pair near the bottom of the opening. One sensor sends an invisible infrared beam horizontally across the doorway, while the other receives it.
During a closing cycle, the opener depends on a clear, stable signal between the two. If an object interrupts the beam—or the receiver loses it because of alignment, interference, wiring, or component trouble—the covered system prevents downward travel or reverses the closing door.
On many covered Chamberlain and LiftMaster systems, the usual arrangement is:
- The sending sensor displays a steady amber or yellow-orange LED.
- The receiving sensor displays a steady green LED when it detects the beam.
In that particular arrangement, the different colors help distinguish the sensors’ roles. They do not mean “warning” and “safe.”
When the amber sending light stays steady, the green receiving LED is often the more useful alignment clue. The sender can continue transmitting while the receiver is:
- Pointed slightly away from the beam
- Blocked by an object or debris
- Affected by glare or moisture
- Moving in a loose bracket
- Losing its electrical connection
- Physically damaged
For the Chamberlain systems covered by the manufacturer’s guidance, the sensors should face each other, remain securely mounted, and sit four to six inches above the floor and no higher than six inches. Exact mounting hardware and adjustment procedures still depend on the model. Chamberlain Group documents the placement and model variations here.
Do not generalize that placement, appearance, or amber-and-green pairing to every manufacturer. Other brands and older generations may use different colors, shapes, mounting systems, and diagnostic behavior. When the installed equipment does not match the common Chamberlain arrangement, follow its own manual rather than a generic color chart.
Read both lights and the door behavior: a symptom-by-symptom guide
Use this table as a sorting tool, not as a substitute for the opener’s diagnostic chart.
| Yellow or amber LED state | Opposite LED state | Door behavior | Likely category | Next safe check |
|---|---|---|---|---|
| Steady | Steady green | Closes normally | Generally normal on covered Chamberlain and LiftMaster systems | Confirm both lights remain steady; do not adjust the sensors solely because one LED is amber |
| Steady | Green blinking or flickering | Refuses to close, stops, or reverses | Unstable beam, receiver misalignment, obstruction, dirty lens, loose bracket, interference, wiring, or sensor trouble | Clear the path, clean both lenses, and inspect receiver alignment and mounting |
| Steady | Green completely off | Usually will not close normally | Receiver is not detecting the beam, lacks a stable connection, or may have a component fault | Check the beam path and accessible wiring, then follow model-specific diagnostics |
| Steady | Green changes when a bracket moves | Closing is intermittent | Loose or shifted mounting | Stop repeatedly bending the bracket; secure it only by the model-approved method |
| Steady | Green changes when a wire moves | Closing is intermittent | Loose connection or damaged wiring | Stop moving the wire and arrange a durable repair |
| Off | Green off or unstable | Door may not close | Power, disconnection, sender wiring, opener, or sensor fault | Inspect accessible low-voltage connections and visible damage, then consult the exact manual |
| Blinking, flickering, or dim | Any state | Intermittent or failed closing | Model-specific diagnostic condition | Record the pattern and compare it with the exact model’s chart |
| Steady | Steady green | Still will not close | Controls, settings, travel configuration, opener diagnostics, or another fault | Stop blaming the yellow light and follow model-specific opener diagnostics |
| Any state | Any state | Will not open | Photo eyes are less likely to explain the symptom | Check broader categories such as power, controls, lock mode, diagnostics, travel settings, or another opener fault |
For covered Chamberlain and LiftMaster systems, a steady amber sender paired with a steady green receiver is normally the expected sensor state. If the sender stays steady while the receiver is off or flickering, manufacturer troubleshooting includes obstruction, misalignment, broken or shorted wiring, incorrect connections, and faulty sensors. Chamberlain Group explains these LED and fault combinations.
A completely dark sending light calls for a different investigation. Check accessible low-voltage connections and wiring for obvious disconnection, cuts, crushing, or other visible damage. Do not declare the sender defective from the dark LED alone; the problem could involve power, wiring, the sensor, or the opener.
Movement can also reveal the fault category. If an LED changes when the bracket vibrates, the mounting may be unstable. If it changes when a wire moves, a connection or conductor may be damaged. Neither observation proves which part has failed, and repeatedly manipulating suspect wiring may worsen the problem.
No generic table can reliably decode an exact blinking rate, unusual dimness, or color transition. Record what you see—including any opener or wall-control indicators—and compare it with the documentation for the precise model.
Why the door may not close even though the yellow light stays on
A powered sender is only one part of the safety circuit. It can remain steadily amber while the beam fails to reach the receiver or becomes unstable there.
The likely causes fall into six practical categories.
1. An object is crossing the beam
The beam runs close to the floor, where small obstacles are easy to overlook. Check for:
- Bicycle wheels
- Garden tools
- Storage bins
- Extension cords
- Leaves and debris
- Cobwebs
- Loose weatherstripping
- Items protruding from shelving
An object can interrupt the beam without making the sending sensor’s amber light go out. Inspect the entire line between the two lenses, not just the area immediately in front of each sensor.
2. Dirty or moisture-covered lenses
Dust, grime, cobwebs, or haze on either lens can weaken the signal. Condensation or other moisture may also create an intermittent condition that resembles misalignment.
Treat moisture as a possibility, not a confirmed diagnosis. If wiping the lenses restores operation only temporarily, investigate why moisture keeps returning instead of continually readjusting the sensors.
3. Misalignment
The sensor housings may appear level while one points just outside the other’s detection range. A bump from a trash can, broom, tire, or stored object may be enough to disturb the aim.
On covered Chamberlain systems, a steady amber sender with a flickering or unlit green receiver directs attention toward the receiving side first. Adjust the green receiving sensor toward a steady LED before making any further model-approved adjustment to the sending side.
4. A loose or shifted bracket
A loose fastener or flexible bracket may allow the sensors to align while the door is still, then lose the beam when the opener and track vibrate. Watch for an LED that flickers during operation or changes when the bracket is lightly disturbed.
Recent track work can be relevant. If a sensor bracket is attached to track hardware, track movement or adjustment may alter the sensor’s aim. Stabilize the bracket using approved hardware rather than repeatedly bending it. If the track itself appears loose, bent, or displaced, stop: track repair and sensor aiming are separate jobs.
5. Sunlight or reflective glare
Direct sunlight entering the receiver can compete with the infrared signal. Reflective surfaces may also redirect glare toward the lens. This can create a time-dependent pattern in which the door works in the morning but fails later in the day.
Sunlight and reflections are recognized as possible sources of receiver interference, but timing alone does not confirm the cause. Garage-door service guidance discusses sunlight, glare, and time-dependent sensor failures. Do not cover, bypass, or disable the sensor; follow the manufacturer’s approved positioning or shielding instructions.
6. Damaged or disconnected wiring
A loose connection, cut conductor, crushed insulation, or tension on the wire may interrupt power or communication. Wiring trouble can leave an LED off, make it flicker, or cause its state to change as the door vibrates.
Inspect only wiring that is readily accessible. Do not guess at wire colors or terminal positions, especially in pre-wired garages where installed cable colors may differ. If electrical testing or work inside the opener is required, stop owner troubleshooting and arrange qualified service.
These faults primarily affect closing because the photo eyes monitor the opening during downward travel. The door may therefore open normally but refuse to descend, begin closing and stop, or reverse to the open position.
Safe troubleshooting sequence: clear, clean, align, inspect, and retest
Work through these checks in order. The goal is to eliminate simple causes before adjusting hardware, investigating wiring, or replacing parts.
1. Make the area safe and clear the beam
Keep people, pets, vehicles, and stored objects away from the door and its travel path. Perform observations and tests from outside that path.
Remove anything crossing the line between the two sensor lenses. Look close to the floor for debris, cords, cobwebs, and objects protruding from either side.
2. Clean both lenses gently
Wipe each lens with a soft, dry cloth. Do not use abrasive pads or aggressive chemicals, soak the housing, or push the sensor out of position while cleaning. A soft, dry cloth is the recommended basic cleaning method in garage-door service guidance. See the lens-cleaning and initial troubleshooting instructions.
3. Observe and record both LEDs before adjusting anything
Stand outside the door’s travel path and note:
- The color of each LED
- Whether each light is steady, blinking, flickering, dim, or off
- Whether the state changes when the door is commanded to close
- Whether the problem occurs at a particular time or in particular weather
- Any diagnostic indicator on the opener or wall control
Take a photo or short video if the symptom is intermittent. A record can help distinguish the normal model-specific arrangement from a condition that changes under vibration, glare, or movement.
4. Check aim and mounting stability
Confirm that the sensors face each other and have not rotated toward the floor, ceiling, doorway, or wall. Look for loose brackets, missing fasteners, bent mounting points, and housings that move during operation.
On covered Chamberlain systems, adjust the green receiving sensor until its LED is steady before making further model-approved adjustments. Avoid loosening both units at once because that removes your reference point.
Do not relocate the sensors higher to avoid an obstruction. Covered Chamberlain-family sensors must remain no higher than six inches above the floor. If the supporting track appears loose, bent, or displaced, stop and arrange appropriate service rather than improvising around it.
5. Inspect accessible low-voltage wiring
With the door stationary, visually follow the sensor wires where they are readily accessible. Look for:
- Loose or disconnected conductors
- Cuts or bite marks
- Crushed or pinched insulation
- Obvious damage
- Wire tension pulling on the sensor or connection
Do not assume that generic wire colors or terminal instructions apply to an unidentified opener. If moving a wire changes an LED, stop manipulating it. The wire or connection needs a durable repair, not a temporary position in which it happens to work.
6. Consider intermittent interference
If the failure depends on the time of day, sunlight or reflective glare may be affecting the receiver. If it follows damp or humid conditions, moisture or lens haze may be contributing.
Observe which sensor faces the light and whether the receiving LED becomes unstable at the same time. Use that pattern as a diagnostic clue, not proof. Do not tape over the eye, insert an object to fool it, or add anything that blocks the beam.
7. Run a complete closing cycle
After clearing the path, cleaning the lenses, and completing any model-approved alignment:
- Move everyone and everything out of the door’s path.
- Command a normal close.
- Watch both indicators from a safe position.
- Look for flickering caused by vibration or bracket movement.
- Confirm that the door completes the cycle normally.
Stop owner troubleshooting if the sender remains off, either LED remains unstable, wiring is substantially damaged, electrical testing is required, or approved adjustments do not restore reliable operation.
Closing failure versus opening failure: do not diagnose by color alone
Photo-eye safety sensors primarily govern downward travel. Misalignment may therefore allow the garage door to open while preventing or reversing closing.
A door that opens normally but will not close, starts downward and reverses, or stops during closing is more consistent with:
- A blocked beam
- An unstable receiving signal
- Misalignment
- A loose bracket
- Interference
- Sensor wiring or component trouble
A door that will not open presents a different diagnostic pattern. If both LEDs appear steady and correct for the model, do not assume the visible yellow light is responsible.
Broad categories for opening or all-operation failure include:
- Loss of opener power
- Remote, wall-control, or control-circuit trouble
- Lock mode
- Model-specific diagnostic conditions
- Travel settings
- Another opener fault
An unresolved LiftMaster troubleshooting exchange illustrates this limitation: the reported opener had one steady yellow light and one green light but would not operate, so the discussion shifted toward controls, power, indicators, and travel settings. No cause was confirmed. Read the unresolved troubleshooting exchange.
That example is not a repair procedure. It shows only that normal-looking sensor LEDs can shift the investigation elsewhere. Do not assume a generic power cycle, programming sequence, or wall-button override applies to your opener; use instructions written for the exact model.
Confirm the repair safely—and know when to stop
A successful adjustment is not confirmed merely because the receiving LED turns on while the door is stationary. Verify that both model-appropriate indicators remain stable through a complete closing cycle and that the brackets do not move out of alignment.
Then perform a beam-interruption test:
- Begin a normal closing cycle.
- Remain outside the door’s travel path.
- Interrupt the infrared beam between the sensors without entering or reaching beneath the moving door.
- Confirm that the covered system stops or reverses the closing door.
Chamberlain’s guidance calls for testing the safety-reversal function after sensor adjustment.
This is a photo-eye beam test, not a contact-reversal test. Do not use a person, pet, vehicle, or object placed beneath the moving door. The goal is to interrupt the light beam from a safe position, not to make the door strike something.
Never:
- Bypass or disable the sensors
- Tape or wire the sensors together to simulate a clear opening
- Permanently defeat the beam
- Relocate the sensors above the manufacturer-specified position
- Treat an override as a repair
- Continue operating a system that fails the beam-interruption test
Safety-sensor guidance specifically warns against bypassing or disabling the photo eyes. See the safety warning and general sensor guidance.
Arrange qualified garage-door service when:
- The sending sensor remains off after basic visual checks
- Either LED continues to blink, flicker, or cut out
- Wiring is cut, crushed, exposed, or otherwise substantially damaged
- A sensor or bracket is physically broken
- Electrical testing or work inside the opener is required
- The symptoms persist after cleaning and model-approved alignment
- Both LEDs are steady but the door still malfunctions
- The system fails the beam-interruption test
- You cannot identify the correct procedure for the installed model
If replacement is recommended, match the sensor set using the opener manufacturer’s model-specific compatibility information.
Frequently asked questions
Should one garage-door sensor be yellow and the other green?
Yes. That can be the normal arrangement on covered Chamberlain and LiftMaster systems: the sending sensor has a steady amber or yellow-orange LED, while the receiving sensor has a steady green LED when it detects the beam.
It is not universal. Some models use different colors, and Chamberlain sensor model 41A4373A is documented as having green LEDs on both sensors. Check the exact opener and sensor documentation before treating either color as a fault.
Why is the yellow light steady while the green sensor light is blinking or off?
A steady yellow or amber sender can remain powered even when the receiver does not detect a stable beam. Possible causes include an object in the path, dirty lenses, receiver misalignment, a loose bracket, sunlight or moisture interference, damaged wiring, or a sensor fault.
Clear the beam and clean both lenses first. Then verify that the receiver faces the sender and remains stable during a closing cycle. If the LED changes when a wire moves or will not stay steady after model-approved alignment, stop and address the mounting or wiring rather than replacing a sensor based on color alone.
Should both garage-door sensor lights be green?
Not necessarily. The correct colors depend on the brand, model, and sensor generation. Many covered Chamberlain-family systems use amber on the sending sensor and green on the receiver, while at least one documented Chamberlain sensor model uses green on both units.
What matters is whether both indicators match the model’s specified state, remain steady, and pass the beam-interruption test.
Can sunlight make a garage-door sensor fail only at certain times of day?
Yes. Direct sunlight or reflective glare can interfere with the receiving sensor, producing failures at a particular time or sun angle. A receiving LED that becomes unstable at roughly the same time each day strengthens that possibility but does not prove it.
Do not block or disable the eye. Clean the lens, verify alignment, and follow model-approved positioning or shielding instructions. Persistent time-dependent trouble may require a technician to distinguish glare from weak alignment, wiring trouble, or sensor deterioration.
When should I stop troubleshooting and call a garage-door technician?
Stop when wiring is substantially damaged, electrical work or model-specific testing is required, a sensor or bracket is broken, or either LED remains unstable after clearing the path and cleaning the lenses.
Professional service is also appropriate when the sender stays off, adjustments will not hold, both LEDs look normal but the door still malfunctions, or the system fails the beam-interruption test. Do not bypass the sensors while waiting for repair.
Bottom line
A steady yellow or amber photo-eye light may be entirely normal, especially on covered Chamberlain and LiftMaster systems—but the opposite sensor and the door’s behavior complete the diagnosis.
If clearing the path, cleaning both lenses, stabilizing model-approved alignment, checking for interference, and visually inspecting accessible wiring do not produce steady, model-appropriate LEDs and a successful beam-interruption test, stop troubleshooting. Use the exact manufacturer instructions or qualified service rather than bypassing the safety system.